Resources
To follow the course, we must have a Computer or laptop ideally. As a last resource, we can try following the material through our phone, although the course has not been designed to be followed by phone so the responsiveness might be affected.
We have plenty of references we can download and use the way that suits us better, from pictures of the model to 3D prints and scans. All the theory has been displayed on the website with a menu on the left for navigation. If you miss something, please let us know, as we might be able to facilitate some help.
A follow-up video step-by-step of the work Javier is doing will be uploaded regularly as we all progress. Also, the Online meetings will be online for the students to review on the same day of each lesson.

Materials & tools
- Plasticine or Oil based clay. This can be NSP Medium, Monsterclay Medium or any other sculpting clay that is not too soft. Suppliers for this type of product are plenty around almost anywhere. In NZ and Australia, we can get it in Barnes, Resincraft only in NZ, and art suppliers. Similar in other countries. Local art supplies are more expensive than any other supplier in general.
- If we are using NSP, we need 3 blocks approx.
- If we are using Monsterclay, 1 blockmight be enough.
- Callipers or something to measure. We can do the scissors-like tool with two thing sticks connected on one side with a screw. Make them tight enough; we do not want to measure things wrong.
- Sculpting tools. These are spatulas, preferably, and some carving tools. The more tools we have, the better. Remember that tools for ceramics are not ideal for sculpting. Javier uses most of the tools from international shops like Alec Tiranti in London. For example, the stainless steel spatulas are all from this place in London. And Compleat sculptor in NY is also a great place to buy all sorts of tools.
- Basic tools will work fine. However, it might be worth the investment,if we want to continue sculpting in the future.
- Lazy Sussan or rotating base. This will make our life very easy. In Europe, we can buy a lazy Sussan for screens or table tops in places like IKEA. We can also buy a lazy Sussan system in a hardware store like Bunnings ( If you are in NZ), Leroy Merlyn ( Europe ), or similar in the States. We can also get it in art supplies stores and pottery suppliers. There are many options around. Then all we need to do is attach a piece of board in each side like you see in the video, and we have a rotatiing table, simple as that!
- Something to heat our clay to help work more comfortably. This is handy specially in cold seassons.Our kitchen oven would work fine; set it to the lowest temperature. 40C degrees would be more than enough. Leave it inside over cooking paper for about 30 min and check it out. If the temperature is too high, it will melt, and we do not want that to happen, so keep track. Another option is using a microwave at maximum power for about a min. Check it out and try again if we need. Be careful; it heats up from the inside out, so we do not want to leave it too long.
- Plumb line. This is just a thread or a cord with a heavy thing attached to one end. A simple key or something similar will do.
- Aluminium wire. Hardware stores like Bunnings in Australia and NZ sell reasonably good thickness wire, close to 1/4 inch thickness. It usually comes in different colours like blue or red. Below is a video to get an idea of the thickness and types of aluminium wire in the market. A thinner wire will be necessary to tide it all down. A skinny, regular wire would be good enough.
- Buy enough to make the armature. Check it out further down this page.
Armature wires
Lazy Susan
Tools
Armature and scale
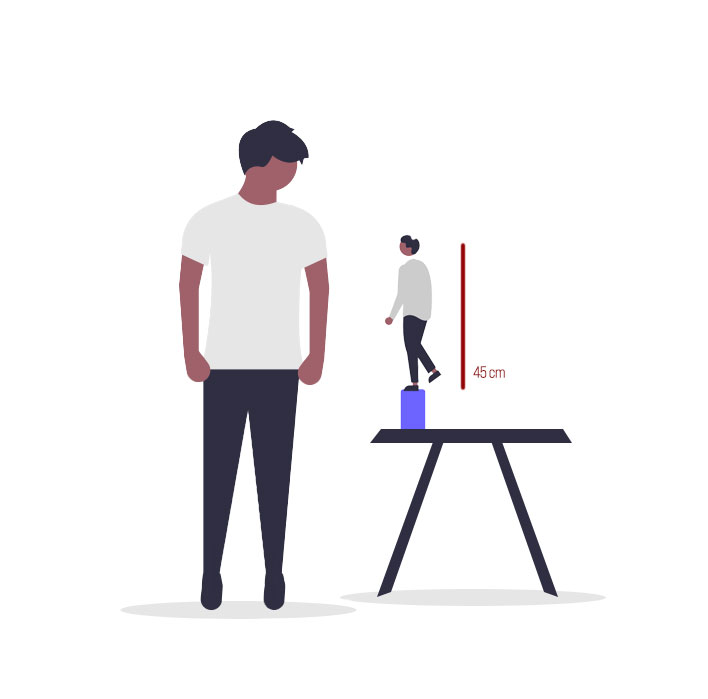
Using the wire we already bought, doing the armature should be very easy. However, first, make sure we get the measurement right. We are working a 1/4 scale approx. , this means that the figure we are building will be 45 cm tall standing. In this case the head will be 6cm high in the cannon.
So let’s start building the armature by taking 120 cm length of the thickest wire and folding it through the middle to have a 60cm double wire. Please do not cut the connection where we fold it; leave it as it is. We need the armature to be 60 cm long. We will be using more than we need to have margen and be safe, this way we should have extra wire we can cut away at any time.
Counting from the top down, find the middle point of the figure at 22.5cm (This is also the pubis level and the insertion of the head of the femur). Once we find it, make an opening in T section. The opening should be 6 cm and no more. Once we finish, DOUBLE CHECK to ensure the opening is still at a 22.5cm distance from the top. This is all we need as an armature; we do not need an extra structure to keep it standing, as the figure will sit.
How to make your armature.
Base set up
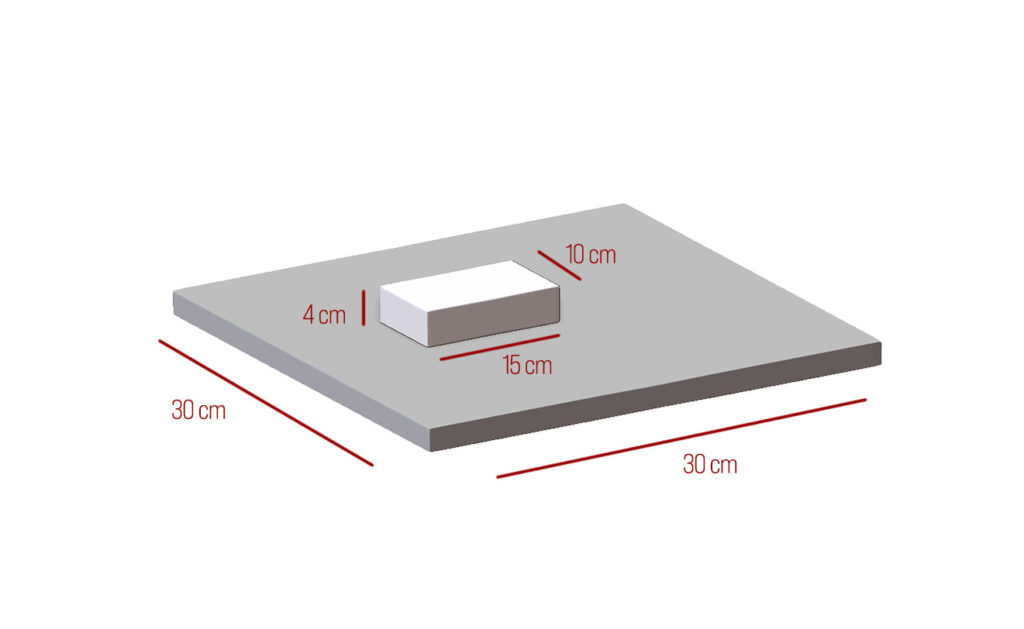
A 30cm minimum square wooden base would be sufficient. The thickness should be no less than 6mm, ideally 12mm MDF, plywood or similar material.
The figure is sitting at a higher level from the ground. So adding another 4cm high square sitting 15 x 10 cm in length and depth should be enough. We can do that by cutting a few pieces of the offset material we use for the base and piling them until we get the ideal size. Then we glue them all together to the base so it does not move.
If we are precious about our work, removing visual distractions by painting the base in a neutral colour such as grey or black does not harm.
Bonus material
If we also do a standing pose for further practice, we need a structure.
Javier will recommend you make a version of the figure standing, aside from the main pose sculpture we will do. This is optional, in case you want to push yourself. However, if you decide to do it, you will need a proper structure to support the weight of the standing pose. Otherwise, it won’t stand by itself.
Here is what you have to do:
The structure is what we need to help us support the weight of the sculpture while we are working on it. Basically this is a stand connecting the sculpture from the back to the floor. For this, we need to use steel or wood, plastic pipes are also a good choice.
The structure has to be strong enough to support the weight of the clay. Usually, the part of the structure that moves forward gets inserted into the body through the back so you can work around the figure with no problem. In our case, it will insert at the pelvis level.
Measurements of the structure :
- 1/4 scale: 40 cm high / 20 cm forward.
- 1/3 scale: 25 cm high / 12 cm forward.
For both cases, a wooden base: 40 x 30 x 1.2 – 1.5 cm (thick) would work fine.
Make sure the structure is well attached to the base. We made a T section at the bottom, which is strong enough.
In example A, Javier made the structure by welding some square tubes. We can also use wood to build this kind of structure example B. Drill a hole at the top and insert a threaded rod bolted to the wood. Please use a thick threaded rod and tighten it to stop it from flipping upside down.
You need to attach a square angle at the end of the structure. This will help to connect the armature and the structure. Check out the video below.

Structure A

Structure B
If we do a second figure standing for our practice, we can connect it to the structure. For that, we will use thin wire. The end of the structure should be attached at 25 cm level, slightly above the T section we made (22.5 cm).
Ensure it is well attached and does not move up, down, or sideways. This is very important so it will not give us trouble halfway down the road. When finished, the T section of the armature we built, will sit at 22.5 cm level from the floor.
In the video we alrady have a structure Javier wealded, although this is something you can build with wood. Make sure it is strong enough.
We are ready to start posing the armature.
How to make your armature.
WARNING: The video shows measurements for 1/3. Please use the measurements described above for 1/4 scale we are using in this course.
Workspace
If we do not have a studio or workspace and plan to work at home, choose a space we do not need to share, as it might get messy. If we do not have that, clean often and protect the floor, especially if we have carpet with plastic or a piece of fabric. A vacuum cleaner is always handy. Plasticine sticks to almost everything, and when we work, it is almost inevitable to drop little bits. At the end of each session, we have to clean very well. Alcohol dissolves plasticine if we need help cleaning the floor or fabric.
Taking pictures for submission
To review the work every week, we must provide pictures that we can take quickly with our phones. So please ensure when to take the pictures by following these criteria, as it is the only way they can be assessed.
The camera must be at the same level as the figure to mimic the picture provided for the work. If the picture has been taken from a higher or lower angle, it will not be possible to work with it.
Provide 4 pictures only. Front, back and 2 profiles. No larger than 1 MB each, preferable.
Ensure the light is not coming from the back, as the figure will be in shadows; it is not too bright or too low.
Upload the pictures to the dropbox folder with your name, and let Javier know. That’s all you need to do.