Categories
BLOG

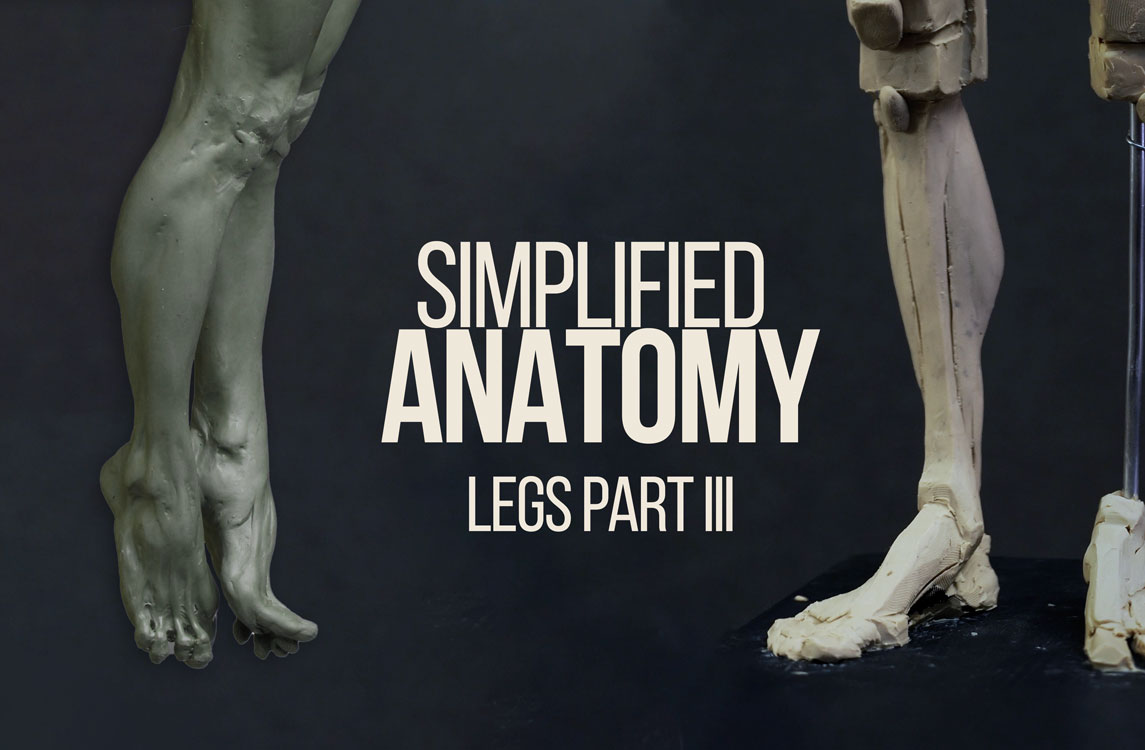
Sculpting Legs part 3. From Structure to Form.

From Structure to Form: Strengthening Your Sculptural Understanding

In previous articles, we’ve established the importance of working with solid references and a clear method. A strong start means using accurate visual sources and building a structured foundation that helps you achieve correct proportions, volume, and balance.

In the video accompanying this article, we move a step further—from basic structure to simplified anatomy. This phase is all about translating anatomy into readable forms that are easy to recognize and recreate. It does require anatomical knowledge—not only understanding where muscles are, but also how to lay them out convincingly in relation to your reference model.


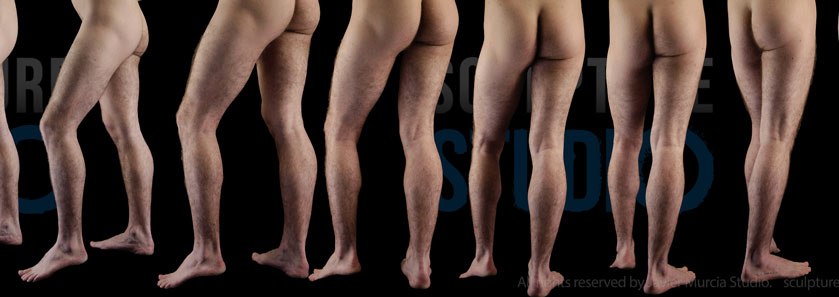
You’ll notice I exaggerate the anatomical shapes quite a bit. This isn’t a stylistic choice but an intentional move to make the structure more visible and obvious. Although the figure in this example is in a resting pose—great for learning—the principles become even more essential when you introduce dynamic poses, which add layers of complexity.

Legs and feet, in particular, can be challenging. Their function in balance and movement means their forms are subtle, often misunderstood, or overlooked. That’s why exercises like this are valuable—they help clarify the form and improve your understanding of what goes where.

If you’re a beginner, intermediate, or even a professional who sometimes feels their work lacks clarity or strength, it might be due to insufficient anatomical integration. This method isn’t about copying a lifelike figure perfectly; it’s about understanding the logic of the anatomy so that your final piece feels more alive, grounded, and intentional.

Personally, working this way has helped me a great deal—clarifying structure, defining mechanics, and pushing anatomy just far enough to avoid softness and achieve strength in my final sculptures.

👉 If you are interested in learning more about how to sculpt the human figure join our Newsletter and we will keep you in the loop for more articles like this, tutorials and online and in person workshops you might find interesting.

Categories
Armatures BLOG

How to make an armature to sculpt a human figure.

When sculpting the human figure, everything begins with a solid foundation — and that foundation is the armature. But before jumping in, it’s essential to understand what you’re building it for. In this case, we’re creating an armature to support a standard-scale figure in oil-based clay (plasticine). The final piece might be molded, or it might simply serve as a sculptural study. Either way, the armature plays a crucial role in supporting your process.

Now, some sculptors choose to work with water-based clay. That’s totally fine, but there’s an important limitation to keep in mind: you can’t fire a piece that has an internal armature. As the clay dries, it contracts — and the wire inside will prevent this natural shrinkage, causing cracks. So if your goal is to fire the sculpture, you’ll need to build it without an armature entirely.

Over the years, I’ve come to recognize a few essentials that make an armature truly functional. It needs to be strong and well secured to its stand so that it holds up under the weight of the clay. But at the same time, it should be flexible enoughto allow minor adjustments as you block in the pose. Most importantly, it must be built to the correct proportions — because once things start drifting off scale, it’s hard to recover.

When it comes to materials, the best option by far is aluminum wire. It bends easily, holds its shape, and is strong enough to act as a skeleton for your figure. Avoid steel wire if you can — it’s far too stiff and makes the process frustrating and difficult. Unfortunately, aluminum wire isn’t always easy to find. That’s why I make it available on my website. But if you’re based far from New Zealand (which, let’s face it, is almost everyone! 😄), you might have luck at local hardware stores or art supply shops. And of course, there’s always the option of ordering it online.

A general rule: the bigger the sculpture, the thicker the wire you’ll need. It’s a simple but important principle that makes a big difference in stability.

To help you get started, I’ve put together a video tutorial walking through the entire process — step by step — to build an armature for a 1:4 scale figure. You’ll see how I set the wire, align the proportions, and attach all toguether. It’s not just about mechanics — it’s about setting yourself up for a smoother sculpting process from the very beginning.


In the next article, I’ll go deeper into the subject of armature stands — how to build them, why they matter, and what to avoid.


Thanks for being here — and see you in the next one.

👉 And if you’ve found this helpful and want more tips, tutorials, and workshop updates, I invite you to sign up for the newsletter. You can also follow me on Instagram where I share process videos, behind-the-scenes looks, and ongoing work.

Categories
BLOG

Sculpting Legs, Part 2.

Sculpting the legs, Part II. Structure.

When doing legs as when approaching any part of the figure, one of the most important parts is the structure. This is one of the basic things but it is at the core of everything. If you get that right, you gained 50% of the work, because in the structure lyes proportions, gesture, balance & weight. 

This is not easy and that is why is something that I focus first, without distractions by using a simplification system. Most beginners or intermediate sculptors don’t pay much attention to this part thinking that by concentrating in learning the anatomy and getting it right, this will help to get the best results. Well, even when this is true, I don’t fully agree with this. 

Below this lines, you’ll see a simplified figure. In this exercise, the anatomy and major forms of the body are all present, but they’ve been reduced to planes and geometric shapes — as you can see in areas like the knees, ribcage, and more. This is exactly the kind of approach I advocate: a structural simplification that still retains the essence of the figure.

It’s the result of a step-by-step method that builds up to this level, from which you can continue developing the piece into a more organic and lifelike sculpture.

 It’s true you need to study anatomy and get it right. That means going through the learning process: trying, failing, correcting, and repeating until things finally click. Every sculptor has done this countless times. In fact, most artists have. It takes time, and it’s part of the journey. No objections there.

I believe the structural aspect of figure sculpting deserves to be isolated and emphasized. Doing so can actually help accelerate that learning curve. It gives you something solid to focus on and builds a foundation for understanding the figure more clearly.

Think of it like painting — you begin with broad strokes and two colors, and only later do you refine the details and expand the palette. Or like building a house — first, you lock the pillars in place, then add the windows, the walls, and all the decoration. Structure gives you the ability to see the figure clearly, with as little detail as possible, and still capture the essence of the form.

To sculpt the human figure with structure in mind, we need a few essential tools: geometry and a simplification system based on a canon. With that alone, you’re ready to begin. Of course, if this is your first time sculpting, you might need some guidance around setting up armatures and materials. No worries — I’ve got you covered. I’ll be posting a separate article with everything you need to get started.

And if you’re already familiar with the basics — let’s get our hands dirty.

👉 Subscribe to the newsletter  to stay updated on new workshop dates, free resources, and more hands-on learning opportunities!

Categories
Armatures BLOG

How to make your own sculpting tools

If you’re a sculptor or just starting out with clay modeling, having the right tools can make a big difference. But did you know you can create your own sculpting tools using simple materials like brass tubes and guitar strings?

In this article, you’ll learn how to make high-quality, custom sculpture tools tailored to your specific needs—perfect for detailing, smoothing, and shaping clay. Whether you’re sculpting the human figure, working on fine details, or experimenting with new textures, this DIY approach is budget-friendly and practical.

Read on to discover step-by-step instructions for building your own clay modeling tools, ideal for use in professional studios or at home.

Easy, Affordable, and Custom

It’s quite straightforward to make this tool: you just need a thin brass pipe and various guitar strings, which you’ll choose based on the type of work you intend to do. In my experience, the thickest bass string (wrapped with a thinner string) is the most efficient, as it creates an ideal texture when evening out the surface at smaller scales.

  • Cut the Pipe:
    Start by cutting a piece of thin brass pipe at least as long as your finger. If it’s too short, it will be difficult to handle and easy to lose.
  • Choose the Guitar String:
    • Reuse Old Strings: If you or someone you know is a musician, you might already have broken guitar strings around.
    • Buy New Strings: If you’re purchasing new strings, note that you’ll have enough material to make dozens of these tools, and they’re quite inexpensive.
  • Shape the Wire:
    • Round End: For a rounded tip, simply fold the wire into a loop.
    • Flat End: If you want a flat scraper, bend the wire at the necessary angles.
      Cut a small piece of wire according to the shape you need, then insert it into the pipe.
  • Secure the Wire:
    • Insert a small piece of paper inside the pipe first to stop glue from running down.
    • Add a drop of superglue (and use an accelerator if you have one) to set it immediately.
  • And that’s it! You now have a custom scraping or texturing tool for your sculpting projects.

The tool may eventually break over time. If that happens, remove the old wire by using a small drill bit to loosen the glue inside the pipe, then pull out the wire with pliers. You can repeat this process as many times as needed to restore your tool. If you want a larger version, look for piano strings, which allow you to create sturdier and bigger tools. 

Categories
BLOG

Sculpting legs, Part 1.

Sculpting the Legs Part 1.— Legs are more important than you think.

Legs have always been one of the trickiest parts of the body to sculpt — at least for me, and for most artists I know.

When we build a figure, it’s natural to pour most of our energy into the areas we use most to interact with the world: the face, the hands, the body language. These are the tools we rely on to express emotion and connect with others. So we give them the majority of our attention.

But the legs… they often get left for last.

Even though they bring so much weight, balance, and life to the sculpture, they are not easy to master. To sculpt legs well, you need a solid understanding of structure, proportions, and anatomy — you can’t simply “guess and hope” your way through. And then, of course, there are the feet: seemingly simple in theory, but notoriously difficult if you want them to actually look convincing. They’re not just a “quick detail” you can fix at the end.

It’s easy to build something that roughly looks like a leg — but it’s just as easy to end up with soft, undefined results that, even from a distance, don’t look truly convincing. Achieving accuracy and definition starts with having good references to look at. This is definitely a big help.

You can always study yourself in the mirror, or if you feel you’re not the ideal model, ask your partner or a friend. No matter how you do it, you need the right visual references to guide your work.
Another great option is to spend time searching online for reference images or purchase professional resources from websites like Posespace.com.


How can you get better results?

That’s something I can definitely help you with. I’ll be sharing more tips in the next article, but if you want a better idea of my full approach, feel free to check out some of my workshops!

In my workshops, both in-person and online, I teach a simplification method specifically designed to make these challenges easier to tackle. We focus on blocking in the main volumes early, finding clean, strong outlines (because sculpting is really drawing in three dimensions), building gesture, balance, and proportion from a solid foundation before moving into smaller anatomical details.

This approach changes how students experience sculpting the legs and feet because it already gives you a clear idea of where to place each part of the body. You start removing the guessing game from the equation, allowing you to focus on achieving the correct forms. At the beginning, it might feel a bit mechanical, but once you get used to the process — which doesn’t take long — it starts to feel surprisingly intuitive, even natural. You stop struggling with the basics and start truly understanding what you’re building.

I’m quite happy of how natural and strong these legs look in the quick study shown here: they feel proportionate, gestural, and anatomically grounded.


Good legs can lift the entire sculpture, literally and artistically.

If you want to dive deeper into these techniques — whether you’re a beginner looking for a structured pathway or a more experienced sculptor wanting to refine your skills — I invite you to join one of my upcoming workshops.

✅ You’ll gain a solid understanding of structure and anatomy.
✅ You’ll learn to simplify complex forms without losing expression.
✅ And most importantly, you’ll build a strong foundation that will support all your future work.


👉 Subscribe to the newsletter  to stay updated on new workshop dates, free resources, and more hands-on learning opportunities!